Tuesday 26 November 2013

How To Use The New Android Remote Lock Option

Earlier in September, an update to the Google
Settings app for Android tipped off that a remote
device lock and password reset feature was on its
way to the Android Device Manager.

On Monday, the service finally went live for most users through the
ADM Website.

Previously, the ADM would only let you ring a
misplaced device or do a remote wipe if you lost
your handset or it fell into the wrong hands.

The addition of remote password reset and screen lock
brings ADM ever closer to the features Apple offers
with Find My iPhone.

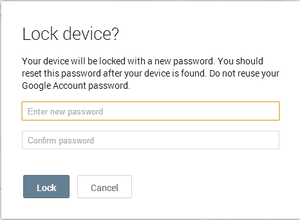
Overall, ADM's remote lock feature worked very
well and incredibly quickly. Once you enter a new
lock device password online, the data is immediately
sent to your Android device and will override any
current pass codes on your smartphone or tablet.

If your handset's home screen is visible, the
display shuts down. Once you turn the screen back
on, your device is locked and will require the new
password to open up again.


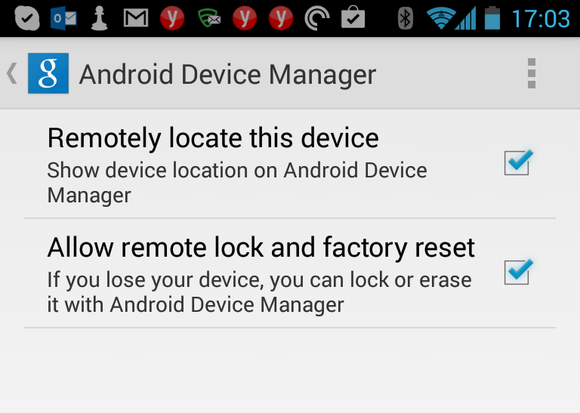
To use the new features, you have to make sure
your device is running Android 2.2 or later and
authorize remote lock and wipe on your device. If
you haven't done this yet, open the Google Settings
app, tap on Android Device Manager at the bottom of
the screen, and then tap the check box next to "Allow remote lock and factory reset." You may like this:-


(Click to enlarge.)

With that set, you simply need to navigate to the Android Device Manager website manage your lost phone.

ADM first rolled out with remote alert and wipe
features in early August filling in a gap long occupied
by several third-party solutions such as Lookout
Security and Antivirus and Total Defense Mobile
Security. Popular third-party custom Android ROM
CyanogenMod is also working on its own ADM-like solution.


My BBM pin;-768B8410

OPENBOR EMULATOR ON PS2(PLAY OLD SCHOOL BEAT 'EM UPS ON PS2)

Hello people!am back and better now,am sorry for not updating this blog for long now,it due to stree in school,

I'm sure most symbian users already
know what Openbor emulator is.
For those who do not know,it's
an emulator meant to emulate
the new beats of rage series
created by SENILE team.
Openbor is short for Open beats of rage.
The beats of rage series was made to
serve as sequel to the sega streets of rage
series.
If you've played God hand and enjoyed
beating people up,then this emulator
is for you.
Beat 'em ups are games about beating people
up,no fancy capes,no plaid skirts,no puzzles,
no fancy stage designs...you just kick the
shit out of your enemies...awesome!.

Enough talk,here are the requirements:
(1)Freemcboot 8mb mem card(don't ask me
how to install this,it's highly classified)

(2)usb or flash drive

(3)Openbor for ps2
download at Here

(4)Openbor roms
download at Here you want more roms?....try google hehehe!)

Procedures:
(1)download the openbor emulator and your prefered roms

(2)open the openbor emulator which is a zip file and unzip the 'bor.elf' file to your usb.

(3)move your openbor rom to the usb as well

(4)rename the openbor rom to 'bor.pak' e.g simpson.pak to bor.pak.

(5)plug the usb to your ps2 and your freemcboot 8mb mem card.

(6)power on ps2,wait for the fmcb logo,when you see it hold 'R1'

(7)Ulaunchelf boots,navigate to mass,press 'O' to open it,loc8 the 'bor.elf',now press 'O' to launch it...enjoy!.

P.S:wondering why you have to rename your openbor rom to 'bor.pak' well thats because
the emulator automatically runs 'bor.pak' as
it's default rom,so if you wanna try another
rom you'd have to rename it to 'bor.pak'.

Mtn reloaded Tweak with openvpn for Pc and android users

No long stories, Mtn works
extensively with OpenVpnon
PC and Android phones; just
configure your deviceas seen
below to ride on with easy
browsing. For Personal Computers

==>Download OpenVPN gui
HERE
==>PC with 32bits download HERE and 64bits HERE
==>Run and install it
==>Download the VPN config
files
HERE
==>Extract the config files on
your desktop and move them
to folder C:\Program Files
\OpenVPN\config
==>Set your modem's APN to
web.gprs.mtnnigeria.net, Primary dns to 8.8.8.8 and
secondary to 8.8.4.4
==>Launch the OpenVPN GUI on
your desktop as
administrator.
==> Connect to your desired server from the OpenVPN icon
in taskbar.


For Android Users Running OS
(4.0+)


==>Get OpenVPN for Android
from playstore or
HERE
==>OpenVPN Connect won't
work with this
==> Download the VPN config
files
HERE
==> Copy the files to your SD
card.
==> Set your apn to
web.gprs.mtnnigeria.net,
leave proxy and port blank
or it won't work
==> Launch OpenVPN for
Android, and import the
configs by tapping the folder
icon located
lower right and browse your
sd card for where it was saved (do this for all config
files).
==>Select your desired server
from the list.
Then hit the connect button.

To successfully use this
tweak before it will be
blocked.

Note:- No username and password required for
connection, we have fixed
that already..

Crown my efforts jare

ICT VPN Working Greatly Via Computer Users Unlimited With MTN[0.0K]

  • I finally unleash ICT-VPN software rocking greatly on pc with a great speed using MTN NIG NETWORK.
    make sure that u connect your Modem using mtn simcard 0.0k (zero naira in ur simcard).


    I've never used vpn before but i'll try out on My own and it works with High Speed.

    Visit ICT-VPN Official website: Here

    After that Rgister Account With Them Here After Registration Dpwnload ICT-VPN Softwaren Here

    Note: You will not be able to start browsing free immediately until You Upgrade Your Username Account to Unlimited
    You Can Upgrade Your Account To Unlimited [url=www.ictvpn.net/payment.php]Here[/ulr] With Just N500 and start flexing ur pc free.

    Why Must I Use ICT-VPN On My PC?
    >Browing free on pc
    >No subscription needed
    >No credit needed.

    After Upgrading Your Account You will neva subscribe to any data plan via Mtn Nig Again.
    #Enjoy.

    Important Notice: Please Make sure that You INSTALL TAP from settings in ICT VPN once You open the software.

    Am using it right now on my pc...

    Ict vpn blazing on pc
  • Tuesday 29 October 2013

    BBM For Android 2.3 Ginger Bread Now Available [Download it Now

    Wow, this is gud news for android users who thier android version is not up to date cos the previous bbm launched can only work for 4.2 jellybean and above..


    BlackBerry Messenger for Android 2.3.6 Gingerbread Tested & Working On Xperia Neo With 2.3.4 Version etc. Phones [ARMv7] Download it Here

    Try this one... Download it Here [Different file, if above didnt work/have a bug].

    This file worked on gingerbread 2.3.4 should worked on 2.3.6 too Download > Install > Open > Register > Wait Activation Email >It Takes 1-2 Days > Open BBM > Create BB ID > Sign Up > Ready

    Do u have a Bug while trying to install ? Try this : "its for armv7......... but u can test for galaxy y by copying libs inside bbm in folder lib/armeabi-v7a to system/lib"

    Extract this to your system/lib If still not working, try not to extract the folder, try extract only file inside armeabi-v7a to system/lib *e.g : "libbbmcore.so"

    Tested b4 and it WORKED on Xperia Neo Android 2.3.4

    This app seems to have a lot of errors, please wait the developer update this app, thanks for your attention, and please dont spam at this blog, i hope you understand.

    Enable USB Dubugging on Android phones

    The USB debugging mode in Android phones allows user to connect their Android devices to their computer to use with Android SDK. and allow enter reaction between computer and phones
    Whenever you want to install custom ROMs on your Android devices, you will need to have debugging mode enabled on your Android devices. The option is available in almost all Android smartphones and tablets but it is not enabled by default and you will need to manually enable it.
    so In this post you will learn how to enable USB debugging mode in Android 4.0 (ICS) and Android 2.3 Gingerbread.
    Android 4.0 Ice Cream Sandwich (ICS):
    • Open Settings
    • Go to Developer Options check USB debugging from there.
    Android 2.3 Ginger bread
    • Open Settings
    • Go to Applications –> Development
    • From there check USB debugging option
    That’s it. You are done. share and like comment if have probem

    upgrade HTE desire tp 4.2 jerry bean custom Rom

    Welcome back HTC Desire HD users rejoice as you have got chance to try Android 4.2 Jelly Bean AOSP Custom ROM on your HTC Desire HD. Though HTC has not even released official Android 4.0 ICS update for HTC Desire HD but thanks to developers for the custom


    handphone
    It is worth mentioning not all the feature of HTC Desire HD won’t work properly when updated to this AOSP Android 4.2 Custom ROM. Before we proceed, make sure:
    1. You have installed your HTC Desire HD USB drivers on your PC.
    2. You need to enable USB debugging mode which is deactivated by default.
    3. You smartphone should have 70-80% charge remaining.
    4. Your HTC Desire HD must be rooted.
    5. Last but not least, backup your important data like Call logs, SMS and other data in stored in phone memory so in case if anything goes wrong, your data is not hurt.
    Once you have fulfilled the above requirements, you can proceed with the tutorial.

    How to Update HTC Desire HD to Android 4.2 Jelly Bean Custom ROM

    Step 1) Download Android 4.2 AOSP Trainwreck Jelly Bean Custom ROM.
    Step 2) Connect your Desire HD USB to your computer using the USB cable.
    Step 3) Copy the downloaded Android 4.2 ROM.zip file to your SD card.
    Step 4) Turn off your phone and then turn it in again in the bootloader mode by pressing and holding the Volume Down + Power buttons.
    Step 5) Now follow the on-screen instructions and select BOOTLOADER and then go to RECOVERY.
    Step 6) Once your smartphone is in ClockworkMod recovery, browse for o the file we have just added to SD card and press the power button to select it.
    Step 7) Press again the power button & select “choose zip from sdcard”.
    Step 8) Navigate to Android 4.2 ROM.zip file and select it using power button. Confirm the installation on the next screen and the installation procedure should start now.
    Step 9) Once installation is completed, go to “+++++Go Back” and reboot the phone.
    Your phone will now boot for the first time in Android 4.2 Jelly Bean, so it might take some time on first boot, however no need to worry since it is normal. share and like if it helps