Updating of your Blackberry OS is a very essential thing to keep
your Phone upto date to the latest Features. Most People Update their
Phone using different techniques e.g:- via Blackberry Desktop Manager & by the Over the Air Updates.
Today, We shall be taking you on a Tour on How to Update your Phone
OS without the use of any PC using the Over the Air Method popularly
called OTA.
I choose to discuss on this because i notice its much more better
because the Size of the Download OS Files is much more lower than that
of other Method and it does not give the chance to lose your Files
unlike the Desktop Manager Method.
SO HOW CAN I UPDATE MY BLACKBERRY OS USING THE OTA METHOD?
1. Settings > Device > Software Updates. This will Check for New Updates, If your OS is upto date, You will be Notified else you will be Prompted to Update your OS.
NOTE:- Once you notice their is a New
Updates and you want to Update your OS, Always charge your Blackberry
battery Full before Proceeding.
click HERE to Add me on Twitter i'm follow you back
A Blog that provide you the best of PC and Mobile Tutorial,Free Browsing,Online gist,New apps downloads and Free way to Success in the technology world!!!!
Saturday, 28 September 2013
Everything needs backup this days, I Guess you know that? If you're
the conscious type like me, You will see more to Backing up of your
Files. Today, We will be sharing a Tips on How to Backup data on your
Andriod device.
These Tips are for both Normal users and more Advanced users who have Rooted their devices. Let’s begin.
We shall be Discussing of 3 Different Ways to Effectively Backup your Andriod Device.
1. Google Contact Sync
2. My Backup
3. Go Backup
The Detailed Explanation on How the 3 different Andriod Backup Scope Works will be Explained...... Let's go
GOOGLE CONTACT SYNC
I flash my Android phone almost everyday with new ROMs or Kernels and I lose my contacts in the process. This also applies whenever I change my mobile device and I need all my contacts.
I use the inbuilt sync feature that comes with Android to sync all my contacts to the cloud. I just perform a restore and here is how you do it.
1. Go to Settings
2. Open Account and Sync
3. Add a Google Account
4. Tap on the account that you just added
5. Tap on Sync Contacts
After doing step 5, all your contacts have been automatically backed up to your Google account and you can access and manage it at http://google.com/contacts.
Remember that you have to sync periodically so that it can update your contact list with newly created contacts.
Note:- This process takes approximately 1-2MB of data.
Why you should use i Use Google Sync?
This is a very effective way to backup your contacts. You can also group your contacts online.
MY BACK UP
This App has been Serving me seriously for Backup Purpose for a very long time now, Its Effective and i enjoy it... One of the Greatest reason why i loves this App is that it does not need root access to backup, It can backup your Apps without it.
If you want a Wonderful App to Backup your Files, Don't dull, Download this App to your Andriod Device now
Download My Backup from Google Play Store
GO BACKUP
GO Backup is a free backup tool that handles data backup and restore very well on Android. The app was made by the makers of the famous Android launcher – Go Launcher EX.
It offers batch backup of your contacts, messages, logs, apps and basically all data on your Android phone. However, I just recently found out you need to have root access on your phone before you can use it to backup application data.
Why you should use it
This is a very clean uncluttered app that just does what it says in the easiest way possible. If you are just in need of something to quickly back up your data, this is your best bet.
Download Go Backup from Google Play Store
=Hit the Facebook Share, if you Enjoy this Tutorial.
click HERE to Add me on Twitter
HOW TO STOP UNKNOWN NUMBERS OR STOP CERTAIN NUMBERS FROM CALLING YOU ON ANDRIOD PHONE
This Tutorial is Exclusively to all Andriod Users
on Naijaloaded. Someone email us some fews days back to publish an
Article on How to Stop some Unknown numbers from calling and also How
to Block some Particulars from Calling.
Today, We're Glad to make the Articles go Live. Now you don't have to worry yourself about someone disturbing you with Unknown Numbers or giving yourself Unneccessary Headache trying to Avoid some Numbers when you can easily blacklist them on your Andriod device. Follow the Simple Steps below:-
HOW TO STOP UNKNOWN NUMBERS & HOW TO BLOCK SOME NUMBERS FROM CALLING YOU
1. Click on the Setting icon on your Phone Homescreen > Call > Call Rejection.
2. Click on Auto Reject Mode and select "Only Blacklist".
3. Now click on the Blacklist , Tick the Unknown [This will Stop any Unknown Number from Calling You]. Then Click the Add button to Add any Numbers you want to Stop from calling you and click on the Save button. You can add as many as Possible.
Thats All.
=> Don't forget to Hit the Share and Share to Facebook and Twitter.
click HERE to Add me on Twitter i;m follow you back
Friday, 27 September 2013
How Receive and Send Any file between to android phones [fileshare]
In android phone with tethering between two phones you can send 500mb
Application in 1mins beacause tethering has more speed then bluetooth
connection
The two phones must have this application before using it..And the application dont use bluetooth connection
2.Install and launch the application, create your username and add your picture to it,thesame with your partner
3.Now Click “CONNECT WITH FRIENDS” option on the Home screen of the flash transfer application in both/all devices.
4. Click CREATE CONNECTION in the Senders/partner device and click SCAN TO JOIN in the Receivers device.
5.Sender’s device will be waiting for a connection to be created after the Receiver joins his/her connection.
6.Now Wait for the Receivers device to establish the connection which will take fee sec.
7.A
successful connection will show the name of both the Sender and
Receiver AVATAR icons on the top left corner of each device.just the
way you see me at my screenshot picture
8.Slide
option is only valid for transferring image files. To transfer an
Image, go to Image tab and long press the image that has to be
transferred.
9.An
option ribbon will appear with 4 commands. Click on SLIDE option to
Share the Image. Sender can also share by clicking on SHARE option on
the ribbon.
10.On
Clicking the SLIDE option, the image will open in the sender’s device.
Slide the Image from Left to Right and the Image will start sliding
into the receiver’s device.
11.On Sliding out the Image from the Senders device, the same will Slide in to the Receivers device.
12.Another option to share or transfer multiple Images is SHAKE.
13.Select the desired image files in the Senders device and SHAKE the handset.
14.Within
seconds, the Images are transferred to the receiver’s device.
Similarly, other files can also be transferred with a SHAKE.
15.All the shared files will reflect under the History Tab.
How To Install Multiple Application On symbain Phone
Auto-sisx-installer is a
powerfull application on symbain sisx(s60v3 and 5), with this
application you can install 100 apps at thesame time or should i say
one after the other without you suffering your self installing with
your free hands
NOTE;..Your phone must be hacked before doing this.
1) Download AutosisxINSTALLER Here now
2) Get xplore or if you do not have one get it here click here
3) install it and when installing it the application will create a folder on your Mcard ( ThinkChange )
4) open you xplore locate the folder call ThinkChange click on it, you will found another subfolder C. which means phone memory, now press 9 or create a folder on the thinkchange name it E which means MCARD ....
5) now select the application you want to install and mark them using your xplore move them to the sub folder call E and paste them there...
6) then goto and open your AUto installer press option start installing
7) share and like or comment if you have problem!!!
click HERE to Add me on Twitter i;m follow you back
Thursday, 26 September 2013
browse with Tweakware VPN on Android phone
Tweakware VPN is blazing and browsing fast on my Android phone. I use
one premium account of N500 for both my Computer and my Android phone,
so when I am not at home, I browse at fast speed with my phone. If you
are not browsing and downloading on your Android phone, then you are
missing!! Do the following if you want to browse with Tweakware VPN on Android phone
(1). You need an Mtn Blackberry Subscription. (other networks will come later)
Text BBCDAY to 21600 for 1 DAY subscription at N100
Text BBCWEEK to 21600 for 1 week subscription at N500
Text BBC to 21600 for 1 month subscription at N1000
(2). Change your Access Point Names (APN) settings like this:
=>Enter SETTINGS=>then Click DUAL SIM SETTINGS =>CONFIGURE DUAL SIM=>MOBILE NETWORK SETTINGS=>ACCESS POINT NAMES.
*There is a button on your Android phone (OPTIONS button), It is the last button towards your left on the body of your phone. Click on it.
-Click NEW APN
-Put any name in the first box. e.g baba2023
-In the second box APN put blackberry.net
*Click on OPTIONS button again. Then click SAVE.
(3) Download OpenVPN Connect from
https://www.dropbox.com/s/xvgtxnr5laew5p1/OpenVPN%20Connect_1.1.12.apk
OR
http://www.mediafire.com/download/rsyp0wbe8aga2gd/OpenVPN_Connect_1.1.12.apk
(4) Download Tweakware VPN config files from
click HERE to Add me on Twitter i;m follow you back
Browse cheaply on Android phone using TweakwareVPN
Tweakware VPN is blazing and browsing fast on my Android phone. I use
one premium account of N500 for both my Computer and my Android phone,
so when I am not at home, I browse at fast speed with my phone. If you
are not browsing and downloading on your Android phone, then you are
missing!! Do the following if you want to browse with Tweakware VPN on Android phone
(1). You need an Mtn Blackberry Subscription. (other networks will come later)
Text BBCDAY to 21600 for 1 DAY subscription at N100
Text BBCWEEK to 21600 for 1 week subscription at N500
Text BBC to 21600 for 1 month subscription at N1000
(2). Change your Access Point Names (APN) settings like this:
=>Enter SETTINGS=>then Click DUAL SIM SETTINGS =>CONFIGURE DUAL SIM=>MOBILE NETWORK SETTINGS=>ACCESS POINT NAMES.
*There is a button on your Android phone (OPTIONS button), It is the last button towards your left on the body of your phone. Click on it.
-Click NEW APN
-Put any name in the first box. e.g baba2023
-In the second box APN put blackberry.net
*Click on OPTIONS button again. Then click SAVE.
(3) Download OpenVPN Connect from
https://www.dropbox.com/s/xvgtxnr5laew5p1/OpenVPN%20Connect_1.1.12.apk
OR
http://www.mediafire.com/download/rsyp0wbe8aga2gd/OpenVPN_Connect_1.1.12.apk
(4) Download Tweakware VPN config files from
(5) Launch OpenVPN Connect, then click on OPTIONS (It is the last button on your phone towards your left hand side), you will see a page come up and on that page click IMPORT. See pic below
(6) Click on IMPORT FROM SD CARD.
(7) You will now be shown a screen where you will see LOCATION:/SD CARD at the top. Now scroll down to the folder where you copied the files you extracted in "step 4" above and click on it. You will see something like this
(8) Click on the first Server you see there having this name TWEAKWARE_TORRENT_1.OVPN, the SELECT button will immediately become White, now click on the SELECT button, you will see PROFILE IMPORTED. (See pic below) Do this importing process individually for all the SERVERS in that folder.
(9) When you finish Importing the Servers, put your USERNAME and PASSWORD in the boxes provided, tick the small SAVE box by the side. Choose a Server by click on OPENVPN PROFILE and selecting any one of your choice (I usually change server when the speed of my browsing is slow).
Click on CONNECT.
Remember that you have to pay for one month subscription of N500 to be able to use this account.
For Account Creation click HERE
OR
http://www.tweakwarevpn.net/index.php?action=register
For Account Funding
Pay N500 into the following Account
HON NICHOLAS TERSOO
FIRST BANK NIGERIA- 2017928007
HON NICHOLAS TERSOO
GUARANTEE TRUST BANK (GTB)- 0026071577
After payment kindly TEXT your payment details to +2348060217623
or
email them to nicobillion@gmail.com
Send the following details: Service Type (i.e VPN ) , Teller Number and Bank Name, Depositor's Name, Amount, Tweakware VPN Username.(
PS: You WILL be notified via text message when your account has been upgraded same day
NB: Sending incomplete details will cause your order to be delayed.
WHEN YOUR TWEAKEWARE IS NO LONGER CONNECTING TO INTERNET, CHECK THE DOWNLOADS PAGE FOR A NEW UPDATE at
http://tweakwarevpn.net/index.php?action=downloads
YOU CAN USE THE ACCOUNT YOU PAID FOR ON BOTH PC AND YOUR ANDROID PHONE.
If you have an Android phone, you can tether the blackberry network to
your computer instead of removing your SIM and inserting inside your
Modem
(1). You need an Mtn Blackberry Subscription. (other networks will come later)
Text BBCDAY to 21600 for 1 DAY subscription at N100
Text BBCWEEK to 21600 for 1 week subscription at N500
Text BBC to 21600 for 1 month subscription at N1000
(2). Change your Access Point Names (APN) settings like this:
=>Enter SETTINGS=>then Click DUAL SIM SETTINGS =>CONFIGURE DUAL SIM=>MOBILE NETWORK SETTINGS=>ACCESS POINT NAMES.
*There is a button on your Android phone (OPTIONS button), It is the last button towards your left on the body of your phone. Click on it.
-Click NEW APN
-Put any name in the first box. e.g baba2023
-In the second box APN put blackberry.net
*Click on OPTIONS button again. Then click SAVE.
(3) Download OpenVPN Connect from
https://www.dropbox.com/s/xvgtxnr5laew5p1/OpenVPN%20Connect_1.1.12.apk
OR
http://www.mediafire.com/download/rsyp0wbe8aga2gd/OpenVPN_Connect_1.1.12.apk
(4) Download Tweakware VPN config files from
(5) Launch OpenVPN Connect, then click on OPTIONS (It is the last button on your phone towards your left hand side), you will see a page come up and on that page click IMPORT. See pic below
(6) Click on IMPORT FROM SD CARD.
(7) You will now be shown a screen where you will see LOCATION:/SD CARD at the top. Now scroll down to the folder where you copied the files you extracted in "step 4" above and click on it. You will see something like this
(8) Click on the first Server you see there having this name TWEAKWARE_TORRENT_1.OVPN, the SELECT button will immediately become White, now click on the SELECT button, you will see PROFILE IMPORTED. (See pic below) Do this importing process individually for all the SERVERS in that folder.
(9) When you finish Importing the Servers, put your USERNAME and PASSWORD in the boxes provided, tick the small SAVE box by the side. Choose a Server by click on OPENVPN PROFILE and selecting any one of your choice (I usually change server when the speed of my browsing is slow).
Click on CONNECT.
Remember that you have to pay for one month subscription of N500 to be able to use this account.
For Account Creation click HERE
OR
http://www.tweakwarevpn.net/index.php?action=register
For Account Funding
Pay N500 into the following Account
HON NICHOLAS TERSOO
FIRST BANK NIGERIA- 2017928007
HON NICHOLAS TERSOO
GUARANTEE TRUST BANK (GTB)- 0026071577
After payment kindly TEXT your payment details to +2348060217623
or
email them to nicobillion@gmail.com
Send the following details: Service Type (i.e VPN ) , Teller Number and Bank Name, Depositor's Name, Amount, Tweakware VPN Username.(
PS: You WILL be notified via text message when your account has been upgraded same day
NB: Sending incomplete details will cause your order to be delayed.
WHEN YOUR TWEAKEWARE IS NO LONGER CONNECTING TO INTERNET, CHECK THE DOWNLOADS PAGE FOR A NEW UPDATE at
http://tweakwarevpn.net/index.php?action=downloads
Ho to root techno F7+ and techno F7
Root Tecno A1 or F7 phones is easy so dont be confuse just follow me and your phone will be rooted like magic
1. Download and install the compactible version of
PDA.net for your PC OS
http://pdanet.co/a/
.
2. Download ERoot from.
.
https://www.dropbox.com/s/cplsu3utpq855k9/eroot_v1.3.3.zip
3. Connect your phone to your PC
4. Enable USB debugging on your Android phone in
Settings > Applications > Development.
5. Install the PDA.net you downloaded earlier on your PC.
6. During the installation you'll be prompted to select your cell phone manufacturer and
also connect yourdevice via USB.
7. Click on Ok and allow to install
8. Extract and run the ERoot downloaded. Ignore the Chinese Language displayed.
9. A root button would appear. If it doesn't, close the pda.net running from your system tray.
10. Click on the root button and your phone would be
rooted in 10 seconds.
11. Disconnect your phone from your pc or laptop.
12. Goto your menu and you will find superuser installed.
13. Reboot your Tecno Phantom A1 or F7.
14. Congratulations your phone is now rooted
Browse unlimitedly with Troidvpn on your Android phone (Not Droidvpn)
When I first saw TROIDVPN in the google play store I thought someone mistakenly spelt Droidvpn
as TROIDVPN. I decided to test it and discovered that IT WORKS !!! It
is free and very easy to set up. The free version gives you 1 gig
everyday to use. Your phone must NOT be rooted before you can use Troidvpn. I am enjoying it. Do this if you want to browse with Troidvpn on your Android phone
YOU WILL NEED AN MTN BLACKBERRY SUBSCRIPTION, with your APN changed to blackberry.net
This works for Android phone versions 4.0 and upwards
1. Download troidvpn from googleplay store
OR type this in your web browser
http://troidvpn.com/TroidVPN.apk
2. Install it, then click on the icon to start it.
3. You will see the screen like the picture below
4. The only things to change are
*Server= any server that has UDP
*Rport= 500
*Lport= 0
*TCP= change it to UDP
*Remember Me= Tick the box
When you change the above things, it should look like the pic below
5. Click on CONNECT. That's all
Tuesday, 24 September 2013
Download FIFA14 for Android
Game description: FIFA 14:
FIFA 14 - a long-awaited continuation of a magnificent football simulator. Choose any command and lead it to the victory.
Features:
Features:
- Excellent realistic graphics
- Intuitive control by gestures
- Thirty three football leagues
- About 600 license teams
- More than 16 thousand players
- Tremendous soundtrack
- Magnificent gameplay
Game demands cache downloading. How to install a game with cache?
Way for cache: sdcard/Android/obb
Download game FIFA 14 free:
The most suitable versions of the game for
Download
Android 2.3.3 and higher. [15 MB][apk]
Download
Android 2.3.3 and higher. [1.25 GB][zip]
how to 6GB on Airtel FREE
HOW TO GET 10GB+ ON AIRTEL AND BROWSE FOR LIFE
Follow the Below Steps to Get Started
=> Step1 Load #1,200 or #1,400 on Your Airtel Sim
=> Step2 then Send BSM to 440 KEEP SENDING THE BSM TO 440 before airtel Replies You that You Have Subscribed for Data Bundle.
Note: the tricks works if you are sharp enough to Keep Sending the BSM to 440.
Meaning, if you can send 5 times you get over 6GB, AND 10times you get over 11GB, wao.. Is that not wonderful?
Just go tell ur friends about www.ogodoupdates,blogspot.com
How to block an Airtel sim
welcome back again
Today am going tp show you how to block Airtel sim card easy and cool trick
Just you have to switch ON your Mobile and type this Number **04*3814*7529*68243# .
Now it will ask you to enter PUK No. so please enter wrong PUK Now your sim will be Blocked..
Please Don't use this Method to harm others Airtel Sim , this is just for educational purpose. Please don't harm others.
Now it will ask you to enter PUK No. so please enter wrong PUK Now your sim will be Blocked..
Please Don't use this Method to harm others Airtel Sim , this is just for educational purpose. Please don't harm others.
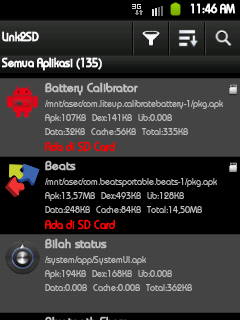
How to link2SD on android phone
today i want to share complete guide and tutorial how to create link2sd on
your android phones. please read carefully so that the installation
process can be done successfully. As we know that Android smartphones
are more and more popular. So many vendors are producing Android device
at an affordable price and hardware specifications are pretty high. One
of the hardware that makes it less convenient, is the small internal
memory. While we know that Android applications available in the Play
Store (Market) there are many great and interesting enough to try. but
when our ointernal memory only have small size maybe after we install
only 20 apps our android will scream very loudly.. haha XD
Configuration After Install Link2SD :
FINISH, now you have succefullt install and use tutorial link2sd on your android phone
So, for the owner of the Android device is a small internal memory (eg,
Galmin, Galyong, etc..) Can use this Link2SD application.
Requirements
- SD Card
- Root Device. #you must have root your android device
TUTORIAL INSTAL LINK2SD
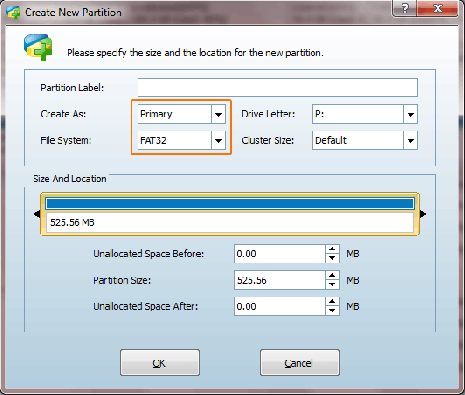
- Create two partition on your sdcard, Partition 1 for the type of storage media with FAT32 File system, Partition 2 to save the links that do the Link2SD application with ext2 type. see how to create a Partition on SD Card.
- In step 10, set up with the instruction below:
- Install Link2SD application from PlayStore
Configuration After Install Link2SD :
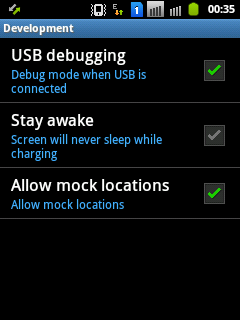
- After download from google play Go to : Settings --> Applications --> Development --> Tick USB Debugging & Allow mock locations
- Open the app Link2SD
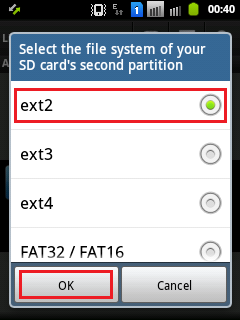
- Select the type ext2, and select OK
- Will appear permission from the app Superuser, select Allow.
- Click OK, turn off and on again HH (restart).
- Click OK, Turn off your android phone then power on again(restart).
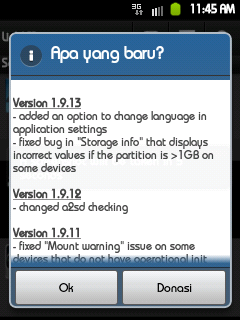
- Open the app Link2SD again, it will display information about Link2SD version.
click ok
How to Create The Link
Open The Link2sd Application
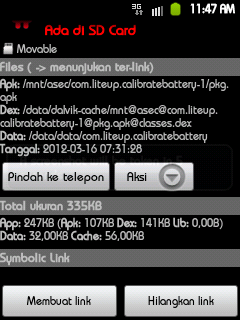
Select an application that you want to be linked to you sd card, for example, Battery Calibrator app. Then select Create Link.
Wait until the process finish, then click OK
Saturday, 21 September 2013
How To Make Free Calls While Chatting On BLACKBERRY MESSENGER
Am sure some must have tried this out while some are not even aware of this, in today's post i will be showing you how you can make free calls while chatting on BBM.
In my own case i use my Android phone to
power my blackberry to ping and browse free of charge without even subscribing for any BIS.
All i did was to
configure my android to tether and broadcast network that powers my blackberry.
So lets go to straight the main purpose of this post, some people have wireless network in their offices, houses etc and yet they are not exploring this unique feature of Blackberry Messenger whereby you can call your friends that are also connected to a wireless network all for free to talk as long as you desire,
see the screenshot below to see how you can talk to your friends for free while pinging on blackberry
The area i circled is the BBM voice chat icon, once you are connected to a wireless network it will automatically be activated, go through your BBM friend list anyone that has same icon with a green colour means that the person is also connected, just click on the icon to start calling the person for free
How To Make Free Calls and Send Free Text Messages WorldWide Via Viber Software
Viber application allows you to text, call,
and send photos and video messages
worldwide for free to over 200 million users using 3G or Wifi. Viber is available for PC, Android, iPhone/iPad, Blackberry, Symbian, Windows Phone and many more devices and platforms.
On Viber, your phone number is your ID.
The application syncs with your mobile contact list, automatically detecting which of your contacts have Viber.
Features of Viber Software
-Free calls with HD sound quality
-Groups with up to 40 participants
-Send stickers and emoticons,
making messaging fun!
-Share locations
-Respond immediately to messages using quick reply
-Push notifications guarantee that you never miss a call or message, even when Viber is
off
-OS integration – share photos and videos straight from your device’s gallery
-Designed with the Native Android UI in mind
-No ads and 100% free
How Does Viber Work
Once you and your friends installed Viber,
you can use it to talk and message as much
as you want.
You don't have to register! No registration or passwords required. As i said earlier Viber uses your phone number as your "identity" and lets you make free Viber phone calls to any of your friends that have Viber - using THEIR phone number.
Once you've downloaded Viber, you will
receive an access code via SMS to activate
Viber.
Ensures that you are the real owner of the cell phone number you have registered and prevents others from obtaining your access code and placing calls with your caller ID.
How To Get Viber Application
To download Viber to any of your device,
log on to www.viber.com ,click on your device then click Get Viber
Direct download link for Devices
» You can also get Viber download
for PC(Windows and Mac).
» Viber for Windows Phone HERE
» Viber for Android HERE
» For iOS HERE
» For Blackberry HERE
» For Nokia Phones HERE
How To Make Calls From Viber Application
With the Viber application running , tap on
the 'contacts' tab at the bottom of the screen.
Tap on the contact's name you want to call.
This will open the 'info' screen and then
just tap on the 'free call' button.
Does Viber Work for International Calls?
Yes! You can make local and international
Viber to Viber calls at no cost. It doesn't matter whether you and your friends are in a completely different country, you can talk and text as much as you want! Just make sure your friends have Viber app installed on their phone too.
Does Viber Work on Blackberry?
Yes, although you might not be able to make calls with your Bis. I tried it on my Blackberry. I was able to chat with my contacts but couldn't call them.
Guess I will need to use a data plan and
configure my Blackberry with my network's APN settings. I read somewhere that if I use WiFi, I will be able to make calls with Viber on Blackberry. You can also try it and share your experience through the comment box.
For now, my brother is rocking Viber on his Android phone.
Thursday, 19 September 2013
Don't Update To iOS 7 Blindly: Consider This Before You Do
In matter of hours (10am Cupertino time),
Apple will publicly release iOS 7 into the wild for the whole Apple fans in the world to download.
Of course there are some folks that really
want to get their hands on this new firmware and try out to see for themselves
while some already know what it looks like
and don't want to be a part of Ive's colour
book.
What is most important is that, just like any
other new Apple firmware, updating your
device to it may leave behind unpleasant
situations.
Therefore, Its important you consider the
following before you update to iOS 7
1. Updating to iOS 7 will erase your device if you didn't back up you contacts and all other stuffs
2. Updating your device to iOS 7 will change your device's baseband. Consequently, if you rely on Gevey unlock especially iPhone 4 folks, you won't be able to unlock your phone's network. Therefore make sure you device is factory unlocked before you jailbreak or you have authorised SIM card.
3. For those with jailbroken devices and want to maintain that jailbreak state,
updating your device to iOS 7 will wipe your device along with the jailbreak. You will lose your jailbreak.
4. Finally, there is no jailbreak for iOS 7 and
we don't know how possible is it to
downgrade once Apple releases iOS 7
today.
So, before you do your upgrade, make sure you have a factory unlocked iPhone that do not require Gevey to unlock and make sure that you do not depend on some apps gotten via Cydia.
how to Watch Live Football Matches and Tv programs using your android Phone, Tablets etc
This is the best android app I can always count on when it comes to streaming Live football matches, Live wrestling matches, Live News programs, Live Movie channels, Live events and sundry.
This App impressed me to the point that I stopped missing to watch Dstv because the dstv mobile decoder cannot even offer me what this great App is offering me now. not to mention about the other alternative apps like the spb tv, netflix Apps that I removed after I installed sybla tv.
The fact remains that, I don¡¯t only watch live matches with this App but also gets update on the time the live broadcast will start coupled with thousand of other channels available at all time for free.
Benefits of the Sybla Tv Application
There are so many good stuffs about the sybla tv app which I have already pointed out at the beginning of this post, I will personally like to list few more features of the app that will definitely wow you;
>> It has no advanced configuration procedures making it very easy for any one to download and use
The Football Matches and Movies shows in full screen
>> It informs you of the time and languages the match will be broadcasted in
>> It is available for free and has no pro-version
>> It is very light and so will work easily with all android devices
>> The app displays the tv unlike other ones that uses your browser
It currently has no memory bug and as such causes no lagging, freezing or error in low end devices
How to Download and Install the sybla Tv Application
As stated above the app do not need you to be an expert before enjoying it, all you will need is the following simple steps to start enjoying the sybla tv android application.
1] Go to settings from your home screen
2] Locate Applications click on it and Enable the option to install non-market apps
Download sybla tv from their website http://www.sybla.com
3] Install and follow the on-screen guide to start enjoying live tv on your android smartphone and devices
Hope it helps......please use the share button below this post to share this information with your friends using Android phones
Downloa ASPHAT 7 HEAT FOR Android
Game description: Asphalt 7 Heat:
Asphalt 7: Heat - mad races for android. Operate any of
60 cars, including such well-known producers, as Ferrari, Aston Martin
and Lamborghini, and even the well-known DeLorean. You are waited for by
race at improbable speeds on 15 routes located in the most beautiful
places on a planet. In the game the multiplayer is improved, now it is
possible to play at the same time to 6 players with selection of matches
and special events. You are waited for by 150 races in a career mode,
in 6 modes and 15 leagues!
Game demands cache downloading. How to install a game with cache?
Way for cache: SDCard/android/Obb/com.gameloft.android.ANMP.GloftA7HM/
Game demands cache downloading. How to install a game with cache?
Way for cache: SDCard/android/Obb/com.gameloft.android.ANMP.GloftA7HM/
Download game Asphalt 7 Heat free:
Select your phone:
The system will select suitable Android games for you.
If your phone is not listed, please, select your platform:
The most suitable versions of the game for
Download
Android 2.2 and higher [9.1 MB][apk]
Download
Android 2.2 and higher. [19.8 MB][apk]
Download
Android 2.2 and higher. [64.8 MB][zip]
Download
Android 2.2 and higher. [1.05 GB][zip]
Download
Android 2.2 and higher. [19.8 MB][apk]
Download
Android 2.2 and higher. v1.0.6 [27.1 MB][apk]
Download
Android 2.2 and higher. v1.0.6. Offline [27.1 MB][apk]
Download
Android 2.2 and higher. v1.0.6. Unlimited [27.4 MB][apk]
Download
Game cache [872.5 MB][zip]
Download
Game cache [442.7 MB][zip]
Download
Game cache. HD [872.5 MB][zip]
Download
Game cache. v1.0.6 [1.05 GB][zip]
Subscribe to:
Posts (Atom)