Tuesday, 26 November 2013

How To Use The New Android Remote Lock Option

Earlier in September, an update to the Google
Settings app for Android tipped off that a remote
device lock and password reset feature was on its
way to the Android Device Manager.

On Monday, the service finally went live for most users through the
ADM Website.

Previously, the ADM would only let you ring a
misplaced device or do a remote wipe if you lost
your handset or it fell into the wrong hands.

The addition of remote password reset and screen lock
brings ADM ever closer to the features Apple offers
with Find My iPhone.

Overall, ADM's remote lock feature worked very
well and incredibly quickly. Once you enter a new
lock device password online, the data is immediately
sent to your Android device and will override any
current pass codes on your smartphone or tablet.

If your handset's home screen is visible, the
display shuts down. Once you turn the screen back
on, your device is locked and will require the new
password to open up again.


To use the new features, you have to make sure
your device is running Android 2.2 or later and
authorize remote lock and wipe on your device. If
you haven't done this yet, open the Google Settings
app, tap on Android Device Manager at the bottom of
the screen, and then tap the check box next to "Allow remote lock and factory reset." You may like this:-


(Click to enlarge.)

With that set, you simply need to navigate to the Android Device Manager website manage your lost phone.

ADM first rolled out with remote alert and wipe
features in early August filling in a gap long occupied
by several third-party solutions such as Lookout
Security and Antivirus and Total Defense Mobile
Security. Popular third-party custom Android ROM
CyanogenMod is also working on its own ADM-like solution.


My BBM pin;-768B8410

OPENBOR EMULATOR ON PS2(PLAY OLD SCHOOL BEAT 'EM UPS ON PS2)

Hello people!am back and better now,am sorry for not updating this blog for long now,it due to stree in school,

I'm sure most symbian users already
know what Openbor emulator is.
For those who do not know,it's
an emulator meant to emulate
the new beats of rage series
created by SENILE team.
Openbor is short for Open beats of rage.
The beats of rage series was made to
serve as sequel to the sega streets of rage
series.
If you've played God hand and enjoyed
beating people up,then this emulator
is for you.
Beat 'em ups are games about beating people
up,no fancy capes,no plaid skirts,no puzzles,
no fancy stage designs...you just kick the
shit out of your enemies...awesome!.

Enough talk,here are the requirements:
(1)Freemcboot 8mb mem card(don't ask me
how to install this,it's highly classified)

(2)usb or flash drive

(3)Openbor for ps2
download at Here

(4)Openbor roms
download at Here you want more roms?....try google hehehe!)

Procedures:
(1)download the openbor emulator and your prefered roms

(2)open the openbor emulator which is a zip file and unzip the 'bor.elf' file to your usb.

(3)move your openbor rom to the usb as well

(4)rename the openbor rom to 'bor.pak' e.g simpson.pak to bor.pak.

(5)plug the usb to your ps2 and your freemcboot 8mb mem card.

(6)power on ps2,wait for the fmcb logo,when you see it hold 'R1'

(7)Ulaunchelf boots,navigate to mass,press 'O' to open it,loc8 the 'bor.elf',now press 'O' to launch it...enjoy!.

P.S:wondering why you have to rename your openbor rom to 'bor.pak' well thats because
the emulator automatically runs 'bor.pak' as
it's default rom,so if you wanna try another
rom you'd have to rename it to 'bor.pak'.

Mtn reloaded Tweak with openvpn for Pc and android users

No long stories, Mtn works
extensively with OpenVpnon
PC and Android phones; just
configure your deviceas seen
below to ride on with easy
browsing. For Personal Computers

==>Download OpenVPN gui
HERE
==>PC with 32bits download HERE and 64bits HERE
==>Run and install it
==>Download the VPN config
files
HERE
==>Extract the config files on
your desktop and move them
to folder C:\Program Files
\OpenVPN\config
==>Set your modem's APN to
web.gprs.mtnnigeria.net, Primary dns to 8.8.8.8 and
secondary to 8.8.4.4
==>Launch the OpenVPN GUI on
your desktop as
administrator.
==> Connect to your desired server from the OpenVPN icon
in taskbar.


For Android Users Running OS
(4.0+)


==>Get OpenVPN for Android
from playstore or
HERE
==>OpenVPN Connect won't
work with this
==> Download the VPN config
files
HERE
==> Copy the files to your SD
card.
==> Set your apn to
web.gprs.mtnnigeria.net,
leave proxy and port blank
or it won't work
==> Launch OpenVPN for
Android, and import the
configs by tapping the folder
icon located
lower right and browse your
sd card for where it was saved (do this for all config
files).
==>Select your desired server
from the list.
Then hit the connect button.

To successfully use this
tweak before it will be
blocked.

Note:- No username and password required for
connection, we have fixed
that already..

Crown my efforts jare

ICT VPN Working Greatly Via Computer Users Unlimited With MTN[0.0K]

  • I finally unleash ICT-VPN software rocking greatly on pc with a great speed using MTN NIG NETWORK.
    make sure that u connect your Modem using mtn simcard 0.0k (zero naira in ur simcard).


    I've never used vpn before but i'll try out on My own and it works with High Speed.

    Visit ICT-VPN Official website: Here

    After that Rgister Account With Them Here After Registration Dpwnload ICT-VPN Softwaren Here

    Note: You will not be able to start browsing free immediately until You Upgrade Your Username Account to Unlimited
    You Can Upgrade Your Account To Unlimited [url=www.ictvpn.net/payment.php]Here[/ulr] With Just N500 and start flexing ur pc free.

    Why Must I Use ICT-VPN On My PC?
    >Browing free on pc
    >No subscription needed
    >No credit needed.

    After Upgrading Your Account You will neva subscribe to any data plan via Mtn Nig Again.
    #Enjoy.

    Important Notice: Please Make sure that You INSTALL TAP from settings in ICT VPN once You open the software.

    Am using it right now on my pc...

    Ict vpn blazing on pc
  • Tuesday, 29 October 2013

    BBM For Android 2.3 Ginger Bread Now Available [Download it Now

    Wow, this is gud news for android users who thier android version is not up to date cos the previous bbm launched can only work for 4.2 jellybean and above..


    BlackBerry Messenger for Android 2.3.6 Gingerbread Tested & Working On Xperia Neo With 2.3.4 Version etc. Phones [ARMv7] Download it Here

    Try this one... Download it Here [Different file, if above didnt work/have a bug].

    This file worked on gingerbread 2.3.4 should worked on 2.3.6 too Download > Install > Open > Register > Wait Activation Email >It Takes 1-2 Days > Open BBM > Create BB ID > Sign Up > Ready

    Do u have a Bug while trying to install ? Try this : "its for armv7......... but u can test for galaxy y by copying libs inside bbm in folder lib/armeabi-v7a to system/lib"

    Extract this to your system/lib If still not working, try not to extract the folder, try extract only file inside armeabi-v7a to system/lib *e.g : "libbbmcore.so"

    Tested b4 and it WORKED on Xperia Neo Android 2.3.4

    This app seems to have a lot of errors, please wait the developer update this app, thanks for your attention, and please dont spam at this blog, i hope you understand.

    Enable USB Dubugging on Android phones

    The USB debugging mode in Android phones allows user to connect their Android devices to their computer to use with Android SDK. and allow enter reaction between computer and phones
    Whenever you want to install custom ROMs on your Android devices, you will need to have debugging mode enabled on your Android devices. The option is available in almost all Android smartphones and tablets but it is not enabled by default and you will need to manually enable it.
    so In this post you will learn how to enable USB debugging mode in Android 4.0 (ICS) and Android 2.3 Gingerbread.
    Android 4.0 Ice Cream Sandwich (ICS):
    • Open Settings
    • Go to Developer Options check USB debugging from there.
    Android 2.3 Ginger bread
    • Open Settings
    • Go to Applications –> Development
    • From there check USB debugging option
    That’s it. You are done. share and like comment if have probem

    upgrade HTE desire tp 4.2 jerry bean custom Rom

    Welcome back HTC Desire HD users rejoice as you have got chance to try Android 4.2 Jelly Bean AOSP Custom ROM on your HTC Desire HD. Though HTC has not even released official Android 4.0 ICS update for HTC Desire HD but thanks to developers for the custom


    handphone
    It is worth mentioning not all the feature of HTC Desire HD won’t work properly when updated to this AOSP Android 4.2 Custom ROM. Before we proceed, make sure:
    1. You have installed your HTC Desire HD USB drivers on your PC.
    2. You need to enable USB debugging mode which is deactivated by default.
    3. You smartphone should have 70-80% charge remaining.
    4. Your HTC Desire HD must be rooted.
    5. Last but not least, backup your important data like Call logs, SMS and other data in stored in phone memory so in case if anything goes wrong, your data is not hurt.
    Once you have fulfilled the above requirements, you can proceed with the tutorial.

    How to Update HTC Desire HD to Android 4.2 Jelly Bean Custom ROM

    Step 1) Download Android 4.2 AOSP Trainwreck Jelly Bean Custom ROM.
    Step 2) Connect your Desire HD USB to your computer using the USB cable.
    Step 3) Copy the downloaded Android 4.2 ROM.zip file to your SD card.
    Step 4) Turn off your phone and then turn it in again in the bootloader mode by pressing and holding the Volume Down + Power buttons.
    Step 5) Now follow the on-screen instructions and select BOOTLOADER and then go to RECOVERY.
    Step 6) Once your smartphone is in ClockworkMod recovery, browse for o the file we have just added to SD card and press the power button to select it.
    Step 7) Press again the power button & select “choose zip from sdcard”.
    Step 8) Navigate to Android 4.2 ROM.zip file and select it using power button. Confirm the installation on the next screen and the installation procedure should start now.
    Step 9) Once installation is completed, go to “+++++Go Back” and reboot the phone.
    Your phone will now boot for the first time in Android 4.2 Jelly Bean, so it might take some time on first boot, however no need to worry since it is normal. share and like if it helps

    Thursday, 24 October 2013

    BBM for Android and ISO officially lunched!!!!

    BBM For Android and iPhone Was Launching Yesterday

    Update
    Its been exactly a month today that BBM failed to launch on the Android platform.

    People have waited for what it seems like
    ages but now the wait is over.

    BBM for Android and iPhone is ready for launch today.


    In other to avert what happened the last
    time, the launch of BBM for android and
    iPhone is taking a different stride due to
    the high volume of people that would want
    to download this app, however, the procedure below will get you your BBM app.

    'BBM Roll Out Details:'

    Download BBM – the easiest way is to visit
    BBM.com from your Android or iPhone browser*

    Once you install the app, open it, and enter
    your email address to hold your spot in line, they will email you as soon as you reach the front of the line and can start using BBM

    If you are among the millions that took the
    time to sign up at BBM.com, you can start
    using BBM immediately without waiting in
    line.* If you didn̢۪t sign up in advance,
    don’t worry – BlackBerry is focused on
    moving millions of customers through the
    line as fast as possible.

    BBM app is already showing up in the
    Google-Play-Store and also for Apple-App-store . So keep checking www.bbm.com for when you can download at your region or
    country, however, it will definitely land today but may be up to 3 days before it moves to Africa completely.

    If you are like me and you can't wait, grab
    the download from HERE for Android and HERE for iPhone.

    Etisalat PC free browsing tweak

    MY FELLOW VISITORS  I WANT TO LET YOU GUYS KNOW THAT ETISALAT PC FREE BROWSING TWEAK IS OUT..


    Ip=>180.242.68.35


    Port:- 80


    APN:- etisalat


    Pass&Username:- wap


    Homepage:- anything


    How Can I Use It On
    PC?


    =>Open your firefox


    =>Go to options


    =>Advance


    =>Network


    =>Click on settings


    =>Manual
    configuration and
    enter the ip and port
    same as above.


    You can equally
    configure it with your
    internet download
    manager For speedy
    download
    If it is slow.


    If you have a modem,
    configure your modem
    and it will carry all
    applications.


    ::Am flexing this pc tweak right now,if your's doesn't work for you,i advice you to go river go wash ya head.....

    2go.@.chibuike1098

    ::ENJOY PALS !

    How to get 5MB on MTN for #5 only


    It Is Well Known That You Can Kindly Subscibe For 5mb By Just 5naira,Only on MTN PULSE Daily

    But Seems It is Not Working These Days;

    SOLUTION
    =========
    If You Are 0n MTN PULSE,Send *406*1# To Opt-in For The Service,Any time u wish

    But If U want To "OPT-OUT" U MUST SEND D OPT-OUT CODE{*406*2#}BY "11:59PM"

    Then You Can Opt-in anytime You want..To be Receiving it Daily,Use The Same Method.

    Sunday, 20 October 2013

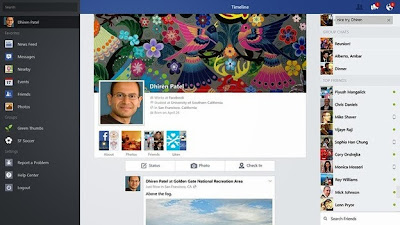
    Early Today We Posted How To Update Windows 8.1 Click Here If You Missed It, Now we'll be dishing out Tip on Facebook Official Windows 8.1 Application Free Download


    Facebook has already started customizing its web layout to provide that clutter free look which we posted earlier. Well possibly we won't get the same look as mentioned in few design layouts but still it has started modifying its layout and soon we will be a getting unified look that will be same for windows apps, iOS and Android phone and even the online layout.

    So now facebook has already released its Windows 8.1 app after this Windows was officially announced. So now this app released for Windows 8.1 platform looks pretty similar to what design has already been demonstrated by facebook in above posts.

    So you will be getting all those sliding and browsing features on the left, so by sliding you will see all hose features, on the right chat will dazzle and you can easily pick any of your friend and start chatting with them easily.


    So now your photos looks much more awesome with this above light-box effect you could see, well you can Like and Comment straight away. You can even have group conversations and then sharing all those files and stuff can be done easily too.

    Download It Here

    You will even get all those notifications and updates on your start screen, so you won't miss any urgent or awesome update by any of your friend. So now obviously you will need Windows 8.1 installed in order to get this app downloaded to your computer.

    So now grab the Windows 8.1 and then just download the app from the links given above and then install it on your Windows to get that awesome FB experience.

    ::. Hope This Help? If Yes Kindly Hit The Share Link Above .::

    Windows 8.1 updates kick off today And Is Available To All User

    ,
    Windows 8.1 updates kick off today And Is Available To All User

    Microsoft is releasing its Windows 8.1 OS
    today. It will be available as a free update
    to existing Windows 8 users and will also
    come pre-installed on new Windows 8 PCs
    sold after tomorrow. The stand-alone retail
    version also launches on October 18.


    Windows 8.1, previously known as Blue, will bring back the Start button, make the Start screen optional (boot to Desktop), will offer more customization options, new spit screen mode, IE 11, better SkyDrive integration, new apps, new connectivity options and lots of other improvements.

    Window 8.1 retail version will cost $120 while the Pro edition goes for $200. You do
    not require any previous Windows version as it was with Windows 8. It̢۪s a complete installation.

    The free Windows 8.1 update for existing
    Windows 8 users will launch at 12PM UK
    time today. If you are running on Windows
    8, you will be able to find the 8.1 update in
    the Windows Store in a few hours.

    Where can I get Windows 8.1?

    The Windows 8.1 update is a free update to Windows 8
    for consumers, DownloaD through the windows-8.1 . You don't need to leave the house to get it, but you will need an
    internet connection.

    MTN rocks free on Operamini4 with super speed!!

    This is working perferctly guys/girls.
    (www.gurusloaded.com)
    insert all the configuration
    settings and u are free to go.


    IP-ADDRESS: 141.0.11.253

    USERNAME: web

    PASSWORD: web

    PORT: 80

    APN: web.gprs.mtnnigera. net
    OR

    blackberry. net


    HOMEPAGE: mtnonline.com

    Now on your
    opera4.2labshander insert the
    below tweak


    HTTP-SERVER: http:// mini5.opera-
    mini. net %3a@
    2f.server4.operamini.com


    SOCKET-SERVER: socket://080.239.242.112:80


    PROXY-TYPE: Host


    PROXY-SERVER:
    www. mtnonline. com %3a@
    mini5.opera-mini. net


    EnJoY & feel the speed

    TROIDVPN - Surf Freely On Android With Your MTN

    For you to enjoy the Free MTN
    0.0 browsing on your
    iPhone, you need to download
    OpenVPN on your iOS with it's
    configure files and configure it
    same as others. But it rocks best when
    you have a Premium
    account.

    iPhone users I'll try as
    much as possible to always look
    for tweak that suit your device
    while Android have theirs.


    Back to Android, while we are
    gallantly waiting for the rolling
    of BBM few days from now, you
    can still rock with your free
    mtn surfing using TroidVPN.

    The last tutorial on Droidvpn I
    posted seems to be
    disconnecting all the time.


    If you have already installed
    TroidVPN on your Android
    Phone, you should be smiling
    after the configuration you will see below.
    If Sandroid didn't work on your android, this is a
    better alternative to
    surf F.O.C

    How Can I Configure TroidVPN To Browse With MTN Sim?


    ==>Download it and install if you
    don't already have it Here

    ==>Set the LPort to 5222p

    ==>Set the RPort to 1110

    ==>Set your apn to
    web.gprs.mtnnigria.net

    ==>Connect and surf with ease.

    Currently, its rocking very fast
    and stable with premium
    account. Tested & Confirmed!


    Friday, 18 October 2013

    How to get 55MB on etisalat

    HOW TO GET FREE 55MB ON
    ETISALAT
    FOLLOW STEPS BELOW 
    • Load N100 You will be given
    5mb And for people that use
    easycliq 
    • DiAL *330*1# you will be
    given 1MB.. Dial it for Twenty
    times you will be given 20MB
    all
    together, That is 25MB, 
    • Load another N100 you will
    be given 10MB all together that
    is 35MB Repeat that
    1MB twenty times you will be
    given
    20MB all together that is 55MB. That is the easy trick

    PC USERS BROWSE FREE ON MTN NETWORK USING SANDWICHVPN


    BROWSE FREE ON MTN NETWORK USING SANDWICHVPN..NO BIS NO SUBCRIBTION

    1. you need to create and account with them if YOU DONT HAVE CREATE A FREE 1 HERE www.sandwichvpn.com/­register3
    2.CHANGE TO TCP MODE AND CLICK ON TCP ADVANCED SETTINGS

    3. TCP PORT PUT 1110

    4. LOCAL PORT PUT 5222

    5. PLS DO NOT TICK ENABLE PROXY
    6. CLICK ON ACCOUNT AND INPUT YOUR USERNAME AND PASSSWORD U JUST REGISTERD

    CONNECT YOUR MODEM USING 

    APN OR ACESSPOINT 


    web.gprs.mtnnigeria.­net 
    USERNAME leave empty password leave empty 

    NO BIS ,IS NEEDED 

    PLS..DONT NOT SUBCRIBE TO BIS FOR THESE,IT WORKS WITH 0.00NARIA ON MTN SIM CARD
    DEMO -TEST SERVERS ALSO WORKS FINE..
     
    follow on Twitter @gr8ogodo

    How to Find Exact Date & Time of Windows Installation

  • You might have installed Windows 7 or Windows 8 and at some point you might have gone into some trouble or so to just find out when you actually installed your Windows on that machine. Well while installing we never make a note of what's the date and time on which we are installing any Windows version on our computer, but Windows automatically makes a note of it and stores it up for you to access later, so in case you need the date and time you can easily access it.

    So now the little command I am stating below when entered will show you the exact date and time on which you installed your Windows OS. So now without wasting time lets jump in to the steps mentioned below.

    1. Open Run by pressing Windows + R key or by using Start Menu.

    2. Now type cmd to open Command Prompt.

    3. Now in command prompt type below code or copy & paste it and press Enter.
    systeminfo | find /i "Original Install Date"

    4. Now just wait for few seconds as it will process and load the information.


    5. So now after few seconds you will see all the information like seen in the above image, so you can see the Original Install date and time.

    So this is the way to see and access original date and time on which your windows OS was installed. Well hopefully this will work fine for you so have fun!
  • Lestest Glo browsing cheat

    Glo Is Rocking With Full Speed on All Opera Handlers.

    Java users should create Prov while Symbian Users should create new Settings.

    Let's go:

    IP:
    190.129.010.245

    PORT:
    80

    Now Insert Bellow Tweak in Opera 4.2 labs or Any Opera handler. download opera4.2labs if You don't have.

    HTTP SERVER:
    82.145.211.16:80

    SOCKET SERVER:
    82.145.211.16:1080

    PROXY SERVER:
    wap.gloworld.com

    Select Host As your Proxy Type, now in Your opera, goto settings then protocol change it to socket.

    That's All.

    NIGERIA USERS ONLY TWEAK DATE 10-10-2013


    MTN Magic Sim Still
    Working With Just #5 Naira!!!

    1. Get a New sim card
    and make sure
    it is registered.

    Warning don't use
    any old
    sim card you have
    use for any magic sim
    trick
    before, dont say I didn't tell you o.

    2. Have a
    minimum balance of #6
    naira, you can make
    call till it gets to #6
    or #10
    then.. Migrate to MTN PULSE by dialing
    *406#.

    3. Set the date on your
    phone to
    August, 15, 2005.

    4. After
    migration then
    subscribe
    4 MTN 5MB Daily
    plan ..dial *406*1#.

    THEN MTN GIVES
    YOU 5MB AND
    DEDUCTS
    JUST 5 NAIRA FROM
    YOUR PHONE AND IT
    ENDS AT 11:59PM. THEN CORRECT YOUR
    DATE.

    5. After subscribing,
    browse wit ur phone
    for
    just 10mins and don't
    download any thing
    ooooh, just only browse...
    and when it
    10mins just off your
    phone or remove
    your sim card.

    6. Note this
    is very important
    when its 11:40pm on
    the
    please start browsing
    and don't stop till 12:30am, MTN
    will not disconnect u
    even
    though your expire
    time is over try And
    download, if you think you will sleep off just
    open ur 2go down...
    Then after 1hr of
    browsing, switch OFF
    your phone nd Switch
    it ON. Then you're good
    to go..

    start browsing
    unlimited
    like
    me, No dulling o,..my
    friends
    have been using it since sunday
    6/10/2013
    thanks to mtn.

    TESTED AND
    CONFIRMED 100%
    WORKING.

    Saturday, 28 September 2013

    HOW TO UPDATE YOUR BLACKBERRY OS USING THE OVER THE AIR METHOD

    Updating of your Blackberry OS is a very essential thing to keep your Phone upto date to the latest Features. Most People Update their Phone using different techniques e.g:- via Blackberry Desktop Manager & by the Over the Air Updates.

    Today, We shall be taking you on a Tour on How to Update your Phone OS without the use of any PC using the Over the Air Method popularly called OTA.
    I choose to discuss on this because i notice its much more better because the Size of the Download OS Files is much more lower than that of other Method and it does not give the chance to lose your Files unlike the Desktop Manager Method.
    SO HOW CAN I UPDATE MY BLACKBERRY OS USING THE OTA METHOD?
    1. Settings > Device > Software Updates. This will Check for New Updates, If your OS is upto date, You will be Notified else you will be Prompted to Update your OS.

    NOTE:- Once you notice their is a New Updates and you want to Update your OS, Always charge your Blackberry battery Full before Proceeding.

    click HERE to Add me on Twitter i'm follow you back

    Everything needs backup this days, I Guess you know that? If you're the conscious type like me, You will see more to Backing up of your Files. Today, We will be sharing a Tips on How to Backup data on your Andriod device.

    These Tips are for both Normal users and more Advanced users who have Rooted their devices. Let’s begin.
    We shall be Discussing of 3 Different Ways to Effectively Backup your Andriod Device.
    1. Google Contact Sync
    2. My Backup
    3. Go Backup
    The Detailed Explanation on How the 3 different Andriod Backup Scope Works will be Explained...... Let's go
    GOOGLE CONTACT SYNC
    I flash my Android phone almost everyday with new ROMs or Kernels and I lose my contacts in the process. This also applies whenever I change my mobile device and I need all my contacts.

    I use the inbuilt sync feature that comes with Android to sync all my contacts to the cloud. I just perform a restore and here is how you do it.
    1. Go to Settings
    2. Open Account and Sync
    3. Add a Google Account
    4. Tap on the account that you just added
    5. Tap on Sync Contacts
    After doing step 5, all your contacts have been automatically backed up to your Google account and you can access and manage it at http://google.com/contacts.
    Remember that you have to sync periodically so that it can update your contact list with newly created contacts.
    Note:- This process takes approximately 1-2MB of data.
    Why you should use i Use Google Sync?
    This is a very effective way to backup your contacts. You can also group your contacts online.
    MY BACK UP
    This App has been Serving me seriously for Backup Purpose for a very long time now, Its Effective and i enjoy it... One of the Greatest reason why i loves this App is that it does not need root access to backup, It can backup your Apps without it.

    If you want a Wonderful App to Backup your Files, Don't dull, Download this App to your Andriod Device now
    Download My Backup from Google Play Store
    GO BACKUP
    GO Backup is a free backup tool that handles data backup and restore very well on Android. The app was made by the makers of the famous Android launcher – Go Launcher EX.

    It offers batch backup of your contacts, messages, logs, apps and basically all data on your Android phone. However, I just recently found out you need to have root access on your phone before you can use it to backup application data.
    Why you should use it
    This is a very clean uncluttered app that just does what it says in the easiest way possible. If you are just in need of something to quickly back up your data, this is your best bet.
    Download Go Backup from Google Play Store

    =Hit the Facebook Share, if  you Enjoy this Tutorial.

    click HERE to Add me on Twitter

    HOW TO STOP UNKNOWN NUMBERS OR STOP CERTAIN NUMBERS FROM CALLING YOU ON ANDRIOD PHONE

    This Tutorial is Exclusively to all Andriod Users on Naijaloaded. Someone email us some fews days back to publish an Article on How to Stop some Unknown numbers from calling and also How to Block some Particulars from Calling.

    Today, We're Glad to make the Articles go Live. Now you don't have to worry yourself about someone disturbing you with Unknown Numbers or giving yourself Unneccessary Headache trying to Avoid some Numbers when you can easily blacklist them on your Andriod device. Follow the Simple Steps below:-
    HOW TO STOP UNKNOWN NUMBERS & HOW TO BLOCK SOME NUMBERS FROM CALLING YOU
    1. Click on the Setting icon on your Phone Homescreen > Call > Call Rejection.

    2. Click on Auto Reject Mode and select "Only Blacklist".

    3. Now click on the Blacklist , Tick the Unknown [This will Stop any Unknown Number from Calling You]. Then Click the Add button to Add any Numbers you want to Stop from calling you and click on the Save button. You can add as many as Possible.

    Thats All.
    => Don't forget to Hit the Share and Share to Facebook and Twitter. 

    click HERE to Add me on Twitter i;m follow you back

    Friday, 27 September 2013

    How Receive and Send Any file between to android phones [fileshare]

    In android phone with tethering between two phones you can send 500mb Application in 1mins beacause tethering has more speed then bluetooth connection
    HOW TO USE FILEHSHARE 
    The two phones must have this application before using it..And the application dont use bluetooth connection
    1. Download Flash share application on your device and the other person device.
     here
    2.Install and launch the application, create your username and add your picture to it,thesame with your partner 

    3.Now Click “CONNECT WITH FRIENDS” option on the Home screen of the flash transfer application in both/all devices.

    4. Click CREATE CONNECTION in the Senders/partner device and click SCAN TO JOIN in the Receivers device.

    5.Sender’s device will be waiting for a connection to be created after the Receiver joins his/her connection.

    6.Now Wait for the Receivers device to establish the connection which will take fee sec.

    7.A successful connection will show the name of both the Sender and Receiver AVATAR icons on the top left corner of each device.just the way you see me at my screenshot picture

    8.Slide option is only valid for transferring image files. To transfer an Image, go to Image tab and long press the image that has to be transferred.
    9.An option ribbon will appear with 4 commands. Click on SLIDE option to Share the Image. Sender can also share by clicking on SHARE option on the ribbon.

    10.On Clicking the SLIDE option, the image will open in the sender’s device. Slide the Image from Left to Right and the Image will start sliding into the receiver’s device.

    11.On Sliding out the Image from the Senders device, the same will Slide in to the Receivers device.

    12.Another option to share or transfer multiple Images is SHAKE.

    13.Select the desired image files in the Senders device and SHAKE the handset.

    14.Within seconds, the Images are transferred to the receiver’s device. Similarly, other files can also be transferred with a SHAKE.

    15.All the shared files will reflect under the History Tab.

    16.After the whole process, don’t forget to turn off  WIFI connection to save battery consumption. 

    click HERE to Add me on Twitter i;m follow you back

    How To Install Multiple Application On symbain Phone

    Auto-sisx-installer is a powerfull application on symbain sisx(s60v3 and 5), with this application you can install 100 apps at thesame time or should i say one after the other without you suffering your self installing with your free hands
    NOTE;..Your phone must be hacked before doing this.


    1) Download AutosisxINSTALLER Here now

    2) Get xplore or if you do not have one get it here click here


    3) install it and when installing it the application will create a folder on your Mcard ( ThinkChange )

    4) open you xplore locate the folder call ThinkChange click on it, you will found another subfolder C. which means phone memory, now press 9 or create a folder on the thinkchange name it E which means MCARD ....

    5) now select the application you want to install and mark them using your xplore move them to the sub folder call E and paste them there...

    6) then goto and open your AUto installer press option start installing


    7) share and like or comment if you have problem!!!

    click HERE to Add me on Twitter i;m follow you back

    Thursday, 26 September 2013

    browse with Tweakware VPN on Android phone

    Tweakware VPN is blazing and browsing fast on my Android phone. I use one premium account of N500 for both my Computer and my Android phone, so when I am not at home, I browse at fast speed with my phone. If you are not browsing and downloading on your Android phone, then you are missing!! Do the following if you want to browse with Tweakware VPN on Android phone

    (1). You need an Mtn Blackberry Subscription. (other networks will come later)
    Text BBCDAY to 21600 for 1 DAY subscription at N100
    Text BBCWEEK to 21600 for 1 week subscription at N500
    Text BBC to 21600 for 1 month subscription at N1000

    (2). Change your Access Point Names (APN) settings like this:
       =>Enter SETTINGS=>then Click DUAL SIM SETTINGS =>CONFIGURE DUAL SIM=>MOBILE NETWORK SETTINGS=>ACCESS POINT NAMES.
    *There is a button on your Android phone (OPTIONS button), It is the last button towards your left on the body of your phone. Click on it.
       -Click NEW APN
       -Put any name in the first box. e.g baba2023
       -In the second box APN put    blackberry.net

    *Click on OPTIONS button again. Then click SAVE.

    (3) Download OpenVPN Connect from    
    https://www.dropbox.com/s/xvgtxnr5laew5p1/OpenVPN%20Connect_1.1.12.apk
                                                            OR
    http://www.mediafire.com/download/rsyp0wbe8aga2gd/OpenVPN_Connect_1.1.12.apk

    (4) Download Tweakware VPN config files from

    click HERE to Add me on Twitter i;m follow you back

    Browse cheaply on Android phone using TweakwareVPN

    Tweakware VPN is blazing and browsing fast on my Android phone. I use one premium account of N500 for both my Computer and my Android phone, so when I am not at home, I browse at fast speed with my phone. If you are not browsing and downloading on your Android phone, then you are missing!! Do the following if you want to browse with Tweakware VPN on Android phone

    (1). You need an Mtn Blackberry Subscription. (other networks will come later)
    Text BBCDAY to 21600 for 1 DAY subscription at N100
    Text BBCWEEK to 21600 for 1 week subscription at N500
    Text BBC to 21600 for 1 month subscription at N1000

    (2). Change your Access Point Names (APN) settings like this:
       =>Enter SETTINGS=>then Click DUAL SIM SETTINGS =>CONFIGURE DUAL SIM=>MOBILE NETWORK SETTINGS=>ACCESS POINT NAMES.
    *There is a button on your Android phone (OPTIONS button), It is the last button towards your left on the body of your phone. Click on it.
       -Click NEW APN
       -Put any name in the first box. e.g baba2023
       -In the second box APN put    blackberry.net

    *Click on OPTIONS button again. Then click SAVE.

    (3) Download OpenVPN Connect from    
    https://www.dropbox.com/s/xvgtxnr5laew5p1/OpenVPN%20Connect_1.1.12.apk
                                                            OR
    http://www.mediafire.com/download/rsyp0wbe8aga2gd/OpenVPN_Connect_1.1.12.apk

    (4) Download Tweakware VPN config files from

    (5) Launch OpenVPN Connect, then click on OPTIONS (It is the last button on your phone towards your left hand side), you will see a page come up and on that page click IMPORT. See pic below
    (6) Click on IMPORT FROM SD CARD.

    (7) You will now be shown a screen where you will see LOCATION:/SD CARD at the top. Now scroll down to the folder where you copied the files you extracted in "step 4" above and click on it. You will see something like this

     (8) Click on the first Server you see there having this name TWEAKWARE_TORRENT_1.OVPN, the SELECT button will immediately become White, now click on the SELECT button, you will see PROFILE IMPORTED. (See pic below) Do this importing process individually for all the SERVERS in that folder.

     (9) When you finish Importing the Servers, put your USERNAME and PASSWORD in the boxes provided, tick the small SAVE box by the side. Choose a Server by click on OPENVPN PROFILE and selecting any one of your choice (I usually change server when the speed of my browsing is slow).

     Click on CONNECT.

    Remember that you have to pay for one month subscription of N500 to be able to use this account.
    For Account Creation click HERE
                           OR
     http://www.tweakwarevpn.net/index.php?action=register
    For Account Funding
    Pay N500 into the following Account
    HON NICHOLAS TERSOO
    FIRST BANK NIGERIA- 2017928007

    HON NICHOLAS TERSOO
    GUARANTEE TRUST BANK (GTB)- 0026071577

    After payment kindly TEXT your payment details to +2348060217623 
                                      or 
        email them to nicobillion@gmail.com
     Send the following details: Service Type (i.e VPN ) , Teller Number and Bank Name, Depositor's Name, Amount, Tweakware VPN Username.(

    PS: You WILL be notified via text message when your account has been upgraded same day
    NB: Sending incomplete details will cause your order to be delayed.

    WHEN YOUR TWEAKEWARE IS NO LONGER CONNECTING TO INTERNET, CHECK THE DOWNLOADS PAGE FOR A NEW UPDATE at 
    http://tweakwarevpn.net/index.php?action=downloads 
    YOU CAN USE THE ACCOUNT YOU PAID FOR ON BOTH PC AND YOUR ANDROID PHONE. If you have an Android phone, you can tether the blackberry network to your computer instead of removing your SIM and inserting inside your Modem

    Ho to root techno F7+ and techno F7

    Root Tecno A1 or F7 phones is easy so dont be confuse just follow me and your phone will be rooted like magic

    [IMG]

    1. Download and install the compactible version of


    PDA.net for your PC OS 

    http://pdanet.co/a/
    .
    2. Download ERoot from. 
    .

    https://www.dropbox.com/s/cplsu3utpq855k9/eroot_v1.3.3.zip


    3. Connect your phone to your PC


    4. Enable USB debugging on your Android phone in


    Settings > Applications > Development.


    5. Install the PDA.net you downloaded earlier on your PC.


    6. During the installation you'll be prompted to select your cell phone manufacturer and 

    also connect yourdevice via USB.


    7. Click on Ok and allow to install


    8. Extract and run the ERoot downloaded. Ignore the Chinese Language displayed.

    9. A root button would appear. If it doesn't, close the pda.net running from your system tray.

    10. Click on the root button and your phone would be


    rooted in 10 seconds.


    11. Disconnect your phone from your pc or laptop.


    12. Goto your menu and you will find superuser installed.


    13. Reboot your Tecno Phantom A1 or F7.


    14. Congratulations your phone is now rooted

    Browse unlimitedly with Troidvpn on your Android phone (Not Droidvpn)

    When I first saw TROIDVPN in the google play store I thought someone mistakenly spelt Droidvpn as TROIDVPN. I decided to test it and discovered that IT WORKS !!!  It is free and very easy to set up. The free version gives you 1 gig everyday to use. Your phone must NOT be rooted before you can use Troidvpn. I am enjoying it.  Do this if you want to browse with Troidvpn on your Android phone
    YOU WILL NEED AN MTN BLACKBERRY SUBSCRIPTION, with your APN changed to blackberry.net      
    This works for Android phone versions 4.0 and upwards

    1. Download troidvpn from googleplay store
     OR type this in your web browser
    http://troidvpn.com/TroidVPN.apk

    2. Install it, then click on the icon to start it.

    3. You will see the screen like the picture below

    4. The only things to change are
    *Server= any server that has UDP
    *Rport= 500
    *Lport= 0
    *TCP= change it to UDP
    *Remember Me= Tick the box
    When you change the above things, it should look like the pic below


    5. Click on CONNECT. That's all

    Tuesday, 24 September 2013

    Download FIFA14 for Android

    Screenshots of the FIFA 14 for Android tablet, phone.
    Screenshots of the FIFA 14 for Android tablet, phone.
    Screenshots of the FIFA 14 for Android tablet, phone.
    Screenshots of the FIFA 14 for Android tablet, phone.
    Screenshots of the FIFA 14 for Android tablet, phone.
    Screenshots of the FIFA 14 for Android tablet, phone.
    Screenshots of the FIFA 14 for Android tablet, phone.
    Screenshots of the FIFA 14 for Android tablet, phone.

    Game description: FIFA 14:

    FIFA 14 - a long-awaited continuation of a magnificent football simulator. Choose any command and lead it to the victory.

    Features:
    • Excellent realistic graphics
    • Intuitive control by gestures
    • Thirty three football leagues
    • About 600 license teams
    • More than 16 thousand players
    • Tremendous soundtrack
    • Magnificent gameplay

      Game demands cache downloading. How to install a game with cache?

      Way for cache: sdcard/Android/obb

    Download game FIFA 14 free:


    The most suitable versions of the game for
    Download
    Android 2.3.3 and higher. [15 MB][apk]
    Download
    Android 2.3.3 and higher. [1.25 GB][zip]